

Being new to the baking world, I am learning more and more about all of the different treats you can make…cake pops being one of them! I, apparently, have been living under a rock for the past couple of years as cake pops are one of the hottest baking trends out there now…and besides that, they are super fun (and super yummy!) to make!!
I bought the book Cake Pops: Tips, Tricks, and Recipes for More Than 40 Irresistible Mini Treats by Bakerella and followed the recipe to create these fun and delicious bite-sized treats on a stick!

I used a box of dark chocolate fudge cake mix and a can of vanilla frosting; however, I am sure you can use homemade cake/frosting if you want to make “made from scratch” cake pops. With this being my first time making them, I figured it would be best if I stuck to my good buddy Duncan Hines…besides, he’s been doing this way longer than I have!

Basic Cake Pops
1 box cake mix (cook as directed on box for 13 X 9 cake)
1 can frosting (16 oz.)
2-4 packages candy melts
wax paper
Styrofoam block
lollipop sticks
treat bags
ribbon
1. Bake the cake as directed on the box, using a 9-by-13-inch cake pan. Let cool completely.
2. Once the cake is cooled, get organized and set aside plenty of time (at least an hour) to crumble, roll, and dip 4 dozen cake balls.
3. Crumble the cooled cake into a large mixing bowl. The texture of the cake causes it to crumble easily. Just cut a baked 9-by-13-inch cake into 4 equal sections. Remove a section from the pan, break it in half, and rub the two pieces together over a large bowl, making sure to crumble any large pieces that fall off. You can also use a fork to break any larger pieces of cake apart. Repeat with each section until the entire cake is crumbled into a fine texture. If you have large pieces mixed in, the cake balls may turn out lumpy and bumpy. You should not see any large pieces of cake.
4. Add three-quarters of the container of frosting. (You will not need the remaining frosting.) Mix it into the crumbled cake, using the back of a large metal spoon, until thoroughly combined. If you use the entire container, the cake balls will be too moist.
5. The mixture should be moist enough to roll into 1-1/2-inch balls and still hold a round shape. After rolling the cake balls by hand, place them on a wax paper–covered baking sheet.
6. Cover with plastic wrap and chill for several hours in the refrigerator, or place in the freezer for about 15 minutes. You want the balls to be firm but not frozen.
7. Melt the candy coating, following the instructions on the package. Microwave on medium power for 30 seconds at a time, stirring with a spoon in between. I prefer the Wilton Chocolate Pro as it keeps the candy melted without having to run back and forth to the microwave.
8. Now you're ready to coat. Take a few cake balls at a time out of the refrigerator or freezer to work with. If they're in the freezer, transfer the rest of the balls to the refrigerator at this point, so they stay firm but do not freeze.
9. One at a time, dip about 1/2-inch of the tip of a lollipop stick in the melted candy coating, and insert the stick straight into a cake ball, pushing it no more than halfway through. Dip the cake pop into the melted coating, and tap off any excess coating: Hold the pop over the bowl in one hand, and tap your wrist gently with your other hand. If you use the hand holding the cake pop to shake off excess coating, the force of the movement will be too strong and could cause the cake ball to loosen or fly off the lollipop stick. Tapping the wrist holding the cake pop absorbs some of the impact. The excess coating will fall off, but you will need to rotate the lollipop stick so the coating doesn't build up on one side, making it too heavy on that side. If too much coating starts to build up at the base of the stick, simply use your finger to wipe it off, spinning the lollipop stick at the same time. This can happen if the coating is too thin or too hot. It's not as hard as it sounds; it just takes a little practice.
10. Immediately decorate with sprinkles (or design of choice) and let dry completely in the Styrofoam block.
11. Once cake pops are dry, place in treat bag and tie with ribbon. Store in air tight container (I LOVE my Cupcake Courier).
Tips
– The cake balls will be easier to roll if you wash and dry your hands periodically during the rolling process. Dry your hands completely each time, and make sure you don't get water in the candy coating, as it can make it unusable.
– You can use a mini ice cream scoop to get uniform-size cake balls.
– If you don't need or want to make 48 cake balls, simply divide the cake in half for 24 cake balls or in quarters for 12 and freeze the remaining cake for later use. Remember to reduce the amount of frosting proportionally.
This little baby was a gem! It kept the candy melts perfectly creamy and readily available...just how I like my sweets!

Ooh this cake looks so pretty, but not for long! Once it’s cool, it will be a crumbly pile of mess in a bowl, waiting to be mixed with frosting and rolled into tiny yummy balls of goodness!

After the cake is cooled, cut it into 4 equal sections (at this time you can store any pieces for later use). Remove a section from the pan, break it in half, and rub the two pieces together over a large bowl, making sure to crumble any large pieces that fall off.

Add the frosting to the crumbled cake and mix well using the back of a large spoon.

The mixture is ready when the frosting is completely blended into the cake; no frosting should be seen.

Roll into 1-1/2-inch balls and place them on a wax paper–covered baking sheet.

After the cake balls are prepped, place them in the fridge and get your supplies ready.

If you are using a Wilton Chocolate Pro, be sure to turn it on 5 minutes before placing the candy melts in it.

Look at how smooth and creamy those candy melts are! Now things are about to get exciting!

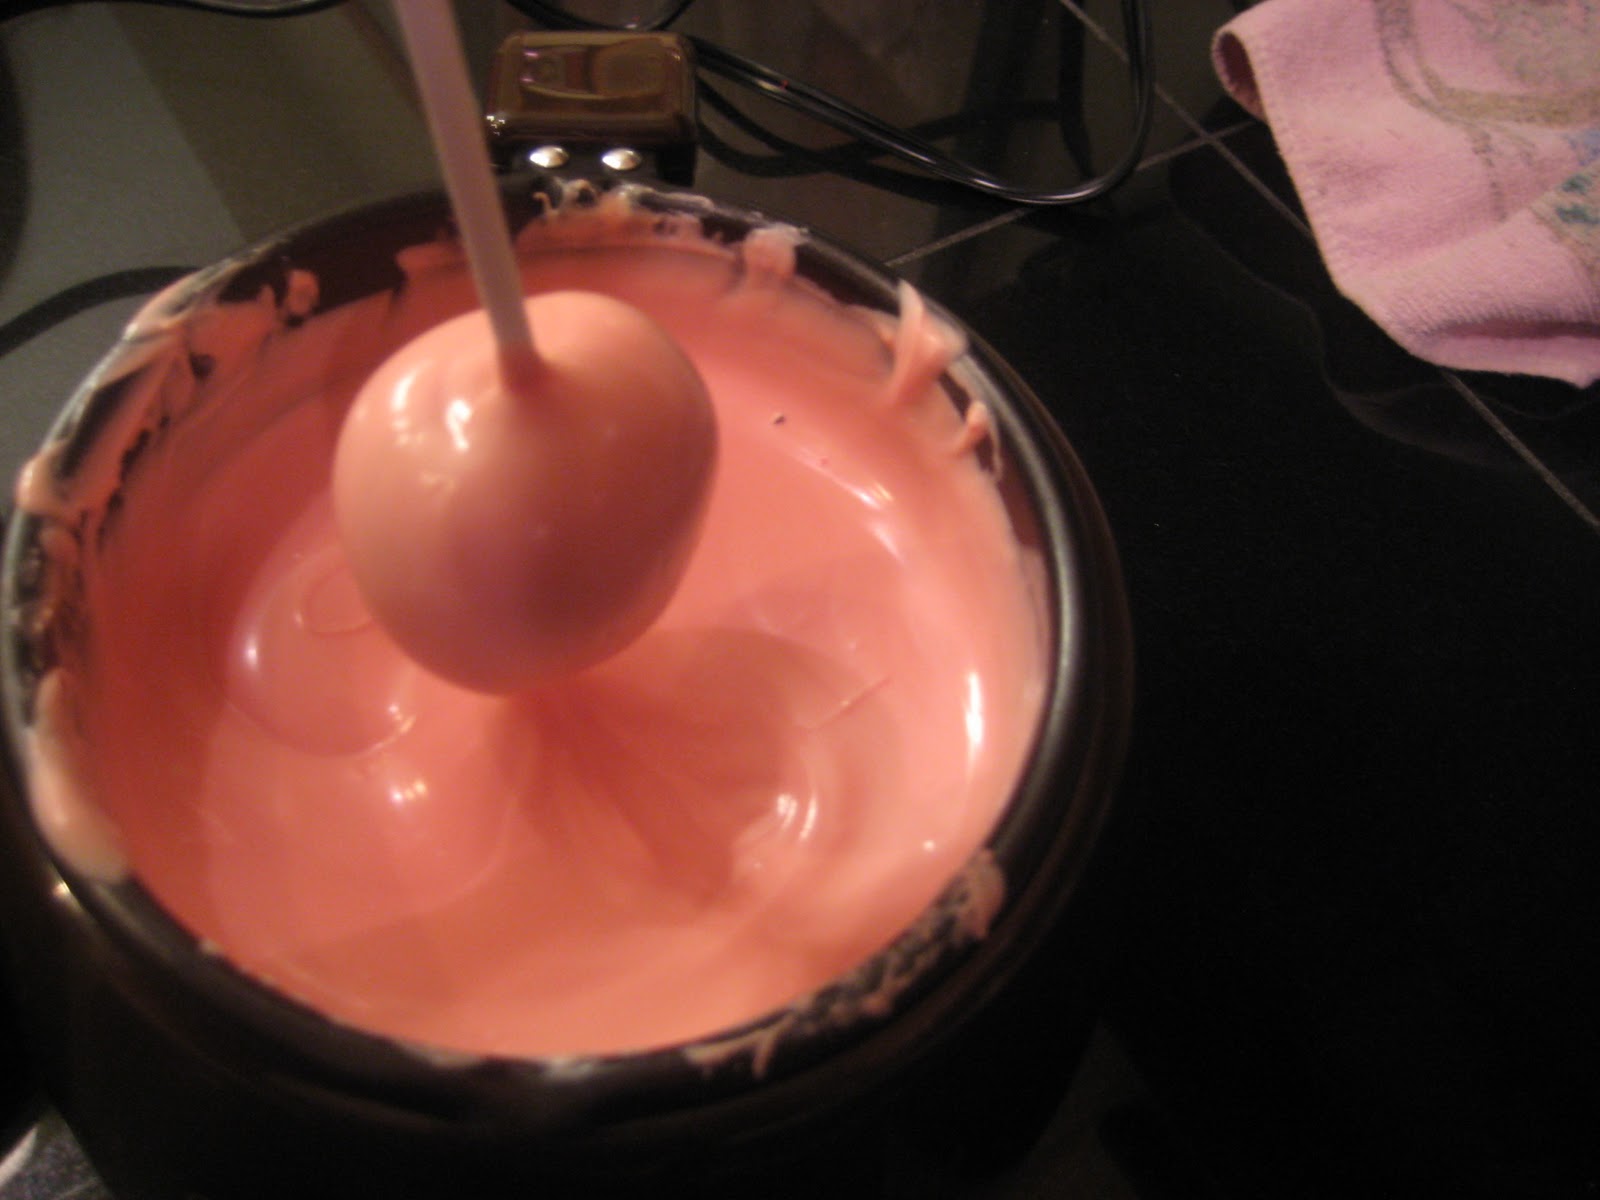
Dip about 1/2-inch of the tip of a lollipop stick in the melted candy coating, and insert the stick straight into a cake ball, pushing it no more than halfway through.

Dip the cake pop into the melted coating, and tap off any excess coating: Hold the pop over the bowl in one hand, and tap your wrist gently with your other hand.

Immediately decorate with sprinkles (or design of choice) and let dry completely in the Styrofoam block.

Once the cake pops are cooled, place in a treat bag and tie with ribbon..viola! A perfect bite sized treat packed with yummy goodness!


I ran out of sprinkles (shame on me for buying only one bottle!) so I decided to try something "funky" with the candy melts. The end result was Spike…who met his fate early and was deliciously devoured by my 8 year old.

And this, my friends, is what the inside of a cake pop/ball looks like...

Anything is good if it's made of chocolate.


